

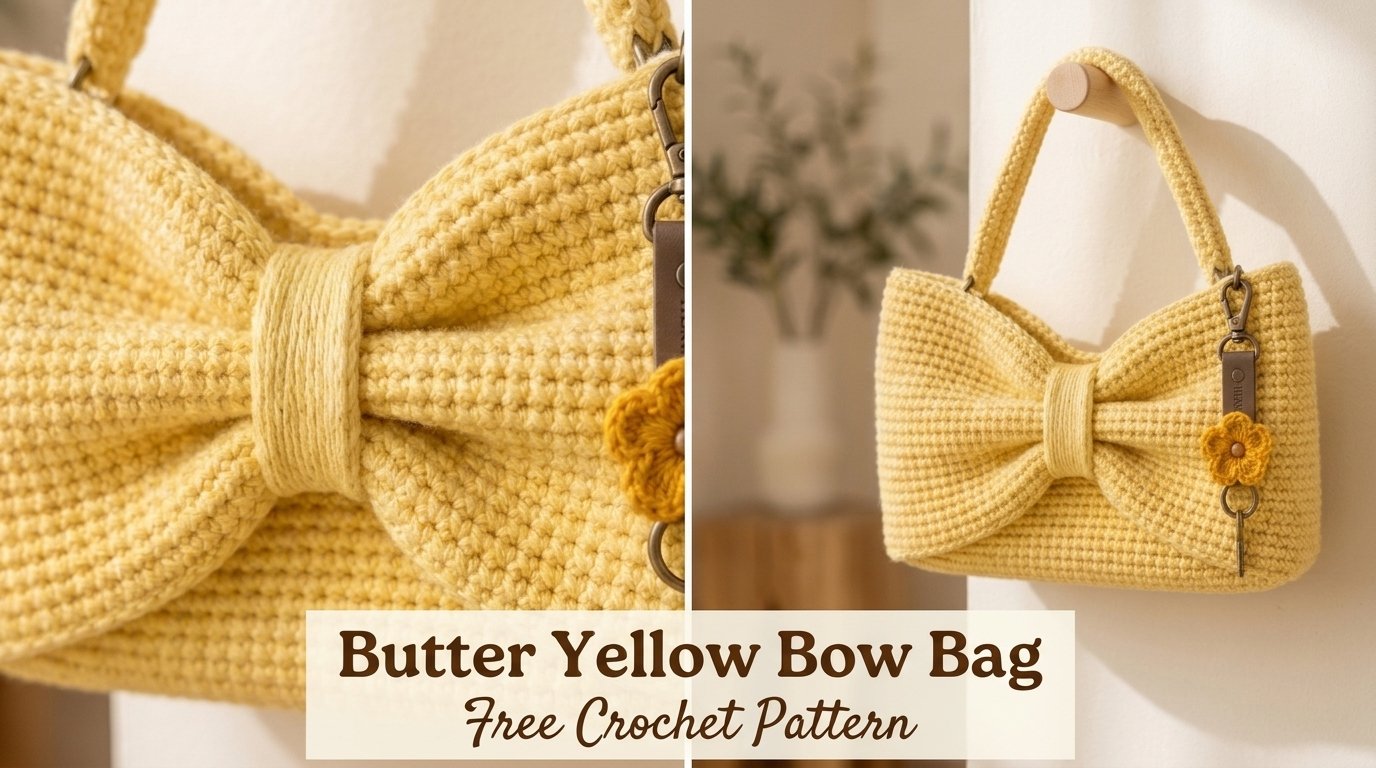
I still remember the exact afternoon this bag started living in my head. I was standing in a little yarn shop, running my fingers over a soft cake of butter-yellow cotton, when a woman walked past carrying the most charming little structured bag with a perfect bow perched on the front. It was bright, cheerful, and somehow managed to look both playful and polished at the same time. I walked out with that yarn and a quiet determination to make something just as delightful.
What began as a simple idea quickly grew into a bag I now reach for constantly. The Butter Yellow Bow Bag is cheerful without being childish, structured enough to hold its shape, and finished with a big, soft bow that makes everyone who sees it smile. The color is pure sunshine—soft and creamy rather than neon—and the overall silhouette is clean and modern with just enough texture to keep the stitching interesting.

This free pattern walks you through every step so you can make your own. It is written for intermediate crocheters who are comfortable with basic stitches, working in the round, and simple assembly. The finished bag is roomy enough for a phone, wallet, keys, and a small notebook, yet still feels light and feminine on the shoulder.
About This Pattern
The Butter Yellow Bow Bag is worked primarily in the round from the base up, creating a sturdy, seamless body. A short flat panel forms the front flap where the large bow is later attached. The strap is made as a long, dense strip that is sewn securely to the sides. The signature bow is crocheted separately as a flat rectangle that is gathered and shaped into a full, dimensional bow, then stitched firmly onto the flap.
Skill level is intermediate. You should be comfortable with single crochet, half double crochet, double crochet, working in the round, and simple seaming. The pattern includes clear stitch counts and checkpoints so you can stay on track.
Finished measurements (after blocking):
- Body width: approximately 9 inches (23 cm)
- Body height (excluding flap): approximately 7.5 inches (19 cm)
- Flap height: approximately 4 inches (10 cm)
- Strap length: approximately 42 inches (107 cm) including join allowances
- Overall depth: approximately 3 inches (7.5 cm)
The bag has a soft but structured feel. It holds its shape nicely without needing interfacing, thanks to the dense stitch pattern and firm cotton yarn. The drape is controlled rather than floppy, which is exactly what you want in a small everyday bag.
Materials You’ll Need
Yarn
- Color A (main body and strap): Butter yellow worsted-weight cotton or cotton-blend yarn, approximately 320 yards / 293 meters
- Color B (bow and optional contrast edge): Soft cream or pale yellow worsted-weight cotton, approximately 90 yards / 82 meters
I used a smooth, tightly spun cotton that gives excellent stitch definition and holds its shape after washing. Allow 15% extra for gauge variation and swatching.
Hooks
- 4.0 mm (G/6) for the bag body and strap
- 3.5 mm (E/4) for the bow (to keep the fabric denser and the bow neater)
Notions
- Tapestry needle
- Stitch markers (at least 4)
- Scissors
- Optional: small piece of lightweight interfacing or fabric stabilizer for the flap if you prefer extra firmness
- Optional: magnetic snap or small button for closure
Abbreviations and Terminology
All instructions use US crochet terminology.
- ch – chain: yarn over, pull through loop on hook
- sc – single crochet: insert hook, yarn over, pull up loop, yarn over, pull through both loops
- hdc – half double crochet: yarn over, insert hook, yarn over, pull up loop, yarn over, pull through all three loops
- dc – double crochet: yarn over, insert hook, yarn over, pull up loop, yarn over, pull through two loops, yarn over, pull through remaining two loops
- sl st – slip stitch: insert hook, yarn over, pull through both the stitch and the loop on the hook
- st(s) – stitch(es)
- sp – space
- rep – repeat
- BLO – back loop only
- FLO – front loop only
- RS – right side
- WS – wrong side
Turning chains do not count as a stitch unless a step explicitly says they do. When working in the round, join with a slip stitch to the first stitch of the round and place a marker in the first stitch to keep track of the beginning.
Gauge
Work a gauge swatch in single crochet using the 4.0 mm hook and Color A:
Chain 18.
Row 1: Sc in 2nd ch from hook and in each ch across. (17 sc)
Rows 2–16: Ch 1, turn, sc in each st across.
The swatch should measure approximately 4 inches (10 cm) wide by 3.5 inches (9 cm) tall.
If your swatch is smaller, go up a hook size. If it is larger, go down a hook size. Accurate gauge keeps the bag proportions correct and the strap comfortable.
Main Pattern Instructions

Bag Base
With Color A and 4.0 mm hook, begin with a magic ring (or ch 4 and join with sl st to form a ring).
Round 1: Ch 1, work 8 sc into the ring. Join with sl st to first sc. (8 sc)
Round 2: Ch 1, 2 sc in each st around. Join. (16 sc)
Round 3: Ch 1, *sc in next st, 2 sc in next st; rep from * around. Join. (24 sc)
Round 4: Ch 1, *sc in next 2 sts, 2 sc in next st; rep from * around. Join. (32 sc)
Round 5: Ch 1, *sc in next 3 sts, 2 sc in next st; rep from * around. Join. (40 sc)
Round 6: Ch 1, *sc in next 4 sts, 2 sc in next st; rep from * around. Join. (48 sc)
Round 7: Ch 1, *sc in next 5 sts, 2 sc in next st; rep from * around. Join. (56 sc)
Round 8: Ch 1, *sc in next 6 sts, 2 sc in next st; rep from * around. Join. (64 sc)
The base should now measure approximately 5.5–6 inches (14–15 cm) across. Do not fasten off.
Bag Body
Continue in continuous rounds without increasing. Place a marker in the first stitch of the next round and move it up each round.
Round 9: Ch 1, sc in each st around. Join. (64 sc)
Rounds 10–28: Repeat Round 9.
At the end of Round 28 the body should measure approximately 7.5 inches (19 cm) tall from the base.
Round 29 (optional contrast edge): Switch to Color B if desired. Ch 1, sc in each st around. Join. Fasten off Color B.
Weave in ends securely on the inside.
Front Flap
The flap is worked flat across the top edge of the bag, centered on the front.
Lay the bag flat and locate the center front. Count 16 stitches to the left and 16 stitches to the right of center (32 stitches total). Place markers at both ends of this section.
Join Color A with a slip stitch at the right-hand marker (when the bag is facing you).
Row 1 (RS): Ch 1, sc in the next 32 sts. Turn. (32 sc)
Row 2: Ch 1, sc in each st across. Turn.
Rows 3–16: Repeat Row 2.
The flap should measure approximately 4 inches (10 cm) tall. Fasten off, leaving a long tail for optional decorative stitching later.
Strap
With Color A and 4.0 mm hook, ch 8.
Row 1: Sc in 2nd ch from hook and in each ch across. (7 sc)
Rows 2–140: Ch 1, turn, sc in each st across.
The strap should measure approximately 42 inches (107 cm). Fasten off, leaving long tails at both ends for sewing.
Special Techniques / Additional Elements
The Bow
The bow is worked as a flat rectangle that is later gathered into shape. Use the 3.5 mm hook and Color B for a denser fabric.
Ch 41.
Row 1: Sc in 2nd ch from hook and in each ch across. (40 sc)
Rows 2–18: Ch 1, turn, sc in each st across.
Fasten off, leaving a 20-inch (50 cm) tail for gathering and securing.
To shape the bow:
- Fold the rectangle in half so the short ends meet.
- Using the long tail, wrap the center tightly several times to create a pinched middle.
- Secure with a few firm stitches through all layers.
- Fluff and shape the loops until the bow looks full and balanced. The finished bow should measure approximately 6 inches (15 cm) wide and 3.5 inches (9 cm) tall.
Optional: Make a small center wrap by chaining 12 and working 6 rows of single crochet. Wrap this strip around the pinched center of the bow and sew the ends together at the back for a polished look.
Assembly and Finishing
- Attach the strap: Position one end of the strap on the left side of the bag, centered vertically about 1 inch (2.5 cm) below the top edge. Using the long tail and tapestry needle, sew securely through both the strap and the bag body for at least 1.5 inches (4 cm). Repeat on the right side, making sure the strap is not twisted.
- Attach the bow: Center the finished bow on the front flap, about 1 inch (2.5 cm) above the lower edge of the flap. Sew firmly through the pinched center of the bow and into the flap, going through several layers for security. The bow should sit proudly on the front and not flop forward.
- Optional closure: Sew a magnetic snap or small button to the underside of the flap and the corresponding spot on the bag body.
- Weave in all remaining ends carefully on the wrong side.
Blocking and Care
Wet-block the bag for the best shape. Fill a basin with lukewarm water and a drop of mild detergent. Submerge the bag (with the bow still attached) and gently press out air bubbles. Let it soak for 15–20 minutes. Squeeze out excess water—never wring. Roll in a clean towel to remove more moisture, then reshape the bag and lay it flat on a blocking mat or thick towel. Pin the base and sides if needed to keep the rectangular silhouette. Allow to dry completely away from direct sunlight and heat.
Care: Hand wash in cool water with mild soap. Squeeze gently and dry flat. Never hang the bag while wet, as the weight of the water can stretch the strap and body. The cotton yarn will soften slightly with washing and become even more pleasant to the touch.
Fit and Troubleshooting Tips

- If the bag body feels too soft or floppy, try a smaller hook or a firmer cotton yarn next time.
- Cupping at the base usually means the early increase rounds were too tight. Relax your tension on the first few rounds.
- If the strap twists easily, work a few rows of slip stitch along the long edges for extra stiffness.
- The bow may look a little flat at first—fluff the loops firmly and adjust the center wrap until it looks full.
- Want a larger bag? Add 8–12 stitches to the final base round and work extra body rounds to match the proportions.
Final Thoughts
There is something deeply satisfying about finishing a small, useful project that also makes you smile every time you pick it up. The Butter Yellow Bow Bag has become one of those pieces for me—cheerful, practical, and just fancy enough to feel special. I hope it becomes a favorite in your rotation too.
I would love to see your version. Share a photo in the comments, tag me on social media, or pin it to your crochet boards so others can find the pattern easily. Happy stitching, and may your bag bring a little extra sunshine wherever it goes.
You Might Also Like
- Midnight Garden Gothic Rose Crochet Bracelet Pattern
- Honeybee Daisy Meadow Charm Bracelet Free Crochet Pattern
- Sage and Terracotta Boho Butterfly Charm Free Crochet Pattern
- Midnight Navy Bow Shoulder Purse Free Crochet Pattern
- Lemon Citrus Summer Charm Bracelet Free Crochet Pattern
FAQ’s
Is this pattern suitable for beginners?
It is written for intermediate crocheters. Absolute beginners may find the shaping of the bow and the precise strap attachment a little challenging, but confident beginners who have made a few seamless projects should manage well with the detailed counts provided.
Can I use acrylic yarn instead of cotton?
Yes, but the bag will have a softer, less structured feel. Cotton or a cotton-blend is recommended for the best shape retention and durability.
How do I adjust the strap length?
Simply work more or fewer rows of the strap. Measure the strap against your preferred cross-body or shoulder length before sewing the ends in place.
Can I make the bag in a different color?
Absolutely. The pattern works beautifully in any solid color or even a soft variegated yarn. Just keep the bow in a coordinating shade so it stands out.
Does the bag need a lining?
It is optional. The dense single-crochet fabric is sturdy enough for everyday use without a lining, but you can add a simple fabric lining if you prefer extra security for small items.
How long does the project take?
Most intermediate crocheters complete the bag in 8–12 hours of focused stitching, depending on speed and whether you make the optional contrast edge and center wrap for the bow.



Leave a Reply
You must be logged in to post a comment.