

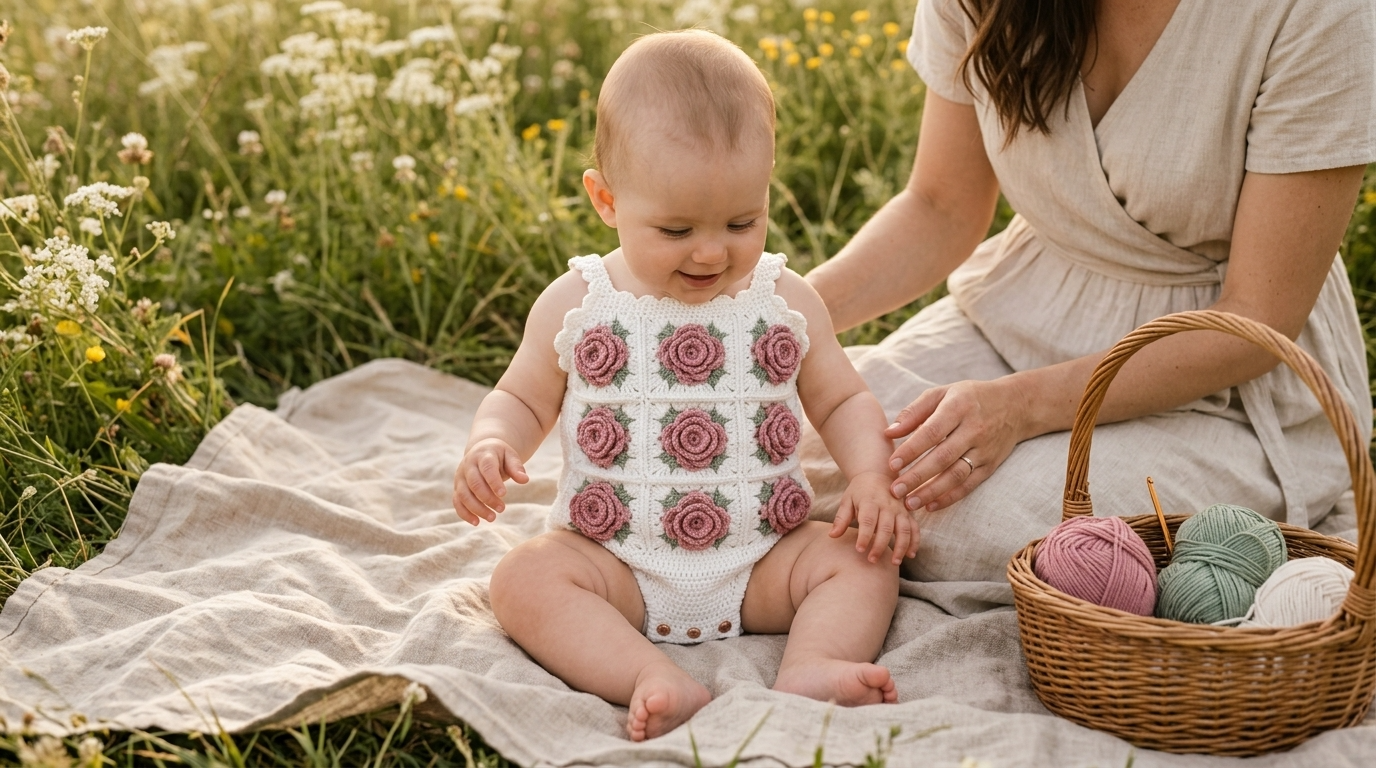
A pink rose granny square romper might just be the sweetest thing you ever hook up for a baby. Those classic squares bloom into a garment that looks boutique-made, yet the construction stays refreshingly simple. Whether you’re a seasoned granny square enthusiast or tackling your first wearable, this project delivers serious charm without the headache. Grab your favorite cotton yarn and let’s make something absolutely precious.
Why Granny Squares Make the Best Baby Clothes
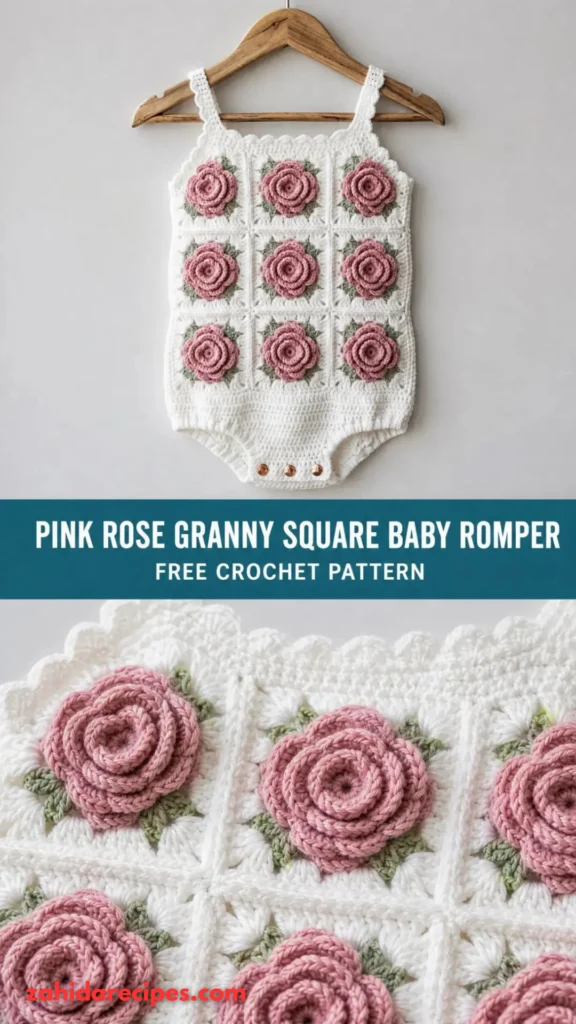
Granny squares are basically the little black dress of crochet—timeless, versatile, and impossible to mess up. For baby garments, they offer something even better: natural stretch, breathable structure, and a patchwork aesthetic that hides all kinds of beginner mistakes.
When you arrange pink rose squares into a romper, you get visual interest without complicated shaping. Each square is a tiny finished project you can celebrate. Stack enough of them together and suddenly you have a bodice, a bloomer section, and maybe even a matching bonnet if you’re feeling ambitious.
The color possibilities are endless. Dusty rose and cream create that vintage nursery vibe. Hot pink and white feel bold and modern. Soft blush with sage green? That’s Pinterest-worthy, no filter needed.
Materials You Will Need
Before you dive in, gather everything so you can crochet without interruption. Trust me—nothing kills momentum like hunting for a yarn needle mid-project.
Here’s your supply list:
- Yarn: DK weight cotton or cotton-blend. Cotton keeps stitches crisp and washes beautifully. You will need roughly 300 to 400 yards total across your colors.
- Color A (Pink Rose): About 150 yards for the square centers and accents
- Color B (Cream or Off-White): About 200 yards for joining and main body sections
- Hook: US Size G-6 / 4.0 mm for squares, US Size F-5 / 3.75 mm for ribbing and straps if you want a snugger fit
- Buttons: Two 3/4-inch buttons for the shoulder straps
- Notions: Yarn needle, scissors, stitch markers, rust-proof pins for blocking
The yarn weight matters here. DK weight gives you squares that feel substantial without being bulky. If you use worsted weight, your romper will fit a bigger baby or come out chunkier than expected.
Choosing the Right Yarn for Baby Skin
Not all yarn loves baby skin equally. Acrylic can feel plasticky and trap heat. Wool might itch. Cotton or cotton-blend yarn breathes well and softens with every wash.
Paintbox Yarns Cotton DK offers excellent stitch definition and a huge color range . Lion Brand 24/7 Cotton has a slight sheen that makes pink shades pop. WeCrochet Dishie is another solid budget-friendly option that holds up wash after wash.
Whatever you pick, always check the care label. A romper that requires hand-washing and flat-drying will sit in the laundry basket forever. Machine-washable is the move.
Understanding Gauge (Yes, You Actually Need to Check It)
I know, I know. Checking gauge feels like homework when you just want to start crocheting. But here’s the thing: granny square projects stack. If each square comes out a quarter-inch too big, that error multiplies across every seam.
With a 4.0 mm hook, one finished granny square should measure approximately 3 inches by 3 inches after blocking. Work a test square first. Block it. Measure it. Adjust your hook size if needed.
Your single crochet gauge for the bodice and shorts should land around 16 to 18 stitches per 4 inches. If your squares are spot-on but your single crochet is wildly off, you will end up with a romper that fits weirdly in places.
A quick swatch saves hours of frogging later. Future you will be grateful.
Building the Pink Rose Granny Squares
Each granny square follows the classic three-round construction. The pink rose effect comes from a dark pink center, a lighter pink middle round, and a cream or white outer round that ties everything together.
The Basic Square Pattern
Start with a magic ring, or chain four and join if magic rings make you want to scream.
Round 1 (Color A – Pink Rose): Chain 3 (counts as first double crochet). Work 2 double crochet into the ring. Chain 2. Repeat (3 double crochet, chain 2) three more times. Join with a slip stitch to the top of the starting chain. You now have four clusters and four corner spaces.
Round 2 (Color A or Color B – depends on your color plan): Slip stitch into the next corner space. Chain 3. Work 2 double crochet, chain 2, 3 double crochet into that same corner space. Chain 1. Move to the next corner space and repeat. Join with a slip stitch.
Round 3 (Color B – Cream): Work 3 double crochet, chain 2, 3 double crochet into each corner space. Work 3 double crochet into each chain-1 space along the sides. Join and fasten off.
That is it. One square done. Now make roughly 12 to 16 more, depending on your size.
How Many Squares Do You Need?
For a 6 to 12 month romper, you will typically need 10 to 14 squares total. The front bodice uses a 2×3 or 3×3 grid. The back panel stays simpler with single crochet rows or a smaller square arrangement.
Make all your squares first. Block them to uniform size. This step is non-negotiable if you want clean seams and a professional-looking finished piece. Blocked squares join like puzzle pieces instead of fighting each other.
Joining Squares and Shaping the Romper
Now comes the satisfying part: assembly.
Joining Methods That Work
You have options here. The flat slip stitch join creates an almost invisible seam on the right side. The whip stitch gives a slightly raised, textured join that can look intentional and charming. Single crochet joins add a decorative ridge.
Pick one method and stick with it throughout. Mixed joins look messy, and not in a cute way.
Work your squares into the bodice shape. For a 3×3 front panel, join three rows of three squares. For the back, you can either mirror the front or work a solid single crochet panel if you want the pink roses to be the front-and-center star.
Creating the Bloomer Section
Below the joined bodice, you transition to the bloomer or shorts portion. Work in single crochet, decreasing gradually to shape the rounded bubble silhouette. Start with fewer stitches at the crotch and increase as you work down toward the legs.
Shaping the crotch requires some counting, but it is not complicated. You essentially work two short rows that connect the front and back panels, then join in the round for the legs. If this is your first romper, read through this section twice before starting.
Adding Leg Openings and Cuffs
Once the body length reaches your desired inseam (usually 8 to 9 inches for 6-12 months), divide the stitches for the two leg openings. Place stitch markers at the center front and center back.
Work each leg opening in the round. For a cleaner finish, add a few rounds of single crochet in a contrasting color for the cuffs. Or keep it simple with a slip stitch edging that just smooths the edge.
Straps, Buttons, and Finishing Touches
The straps make this romper adjustable and easy to get on a squirmy baby.
Creating Adjustable Straps
Chain a length that reaches from the front bodice over the shoulder to the back waist. Work single crochet rows until the strap is about 1 inch wide. Make two straps.
Attach buttons to the back panel at two height options. This gives you room to grow the romper as the baby gets taller.
Button loops work better than buttonholes for crochet straps. Simply chain 3 or 4 at the end of the strap, then slip stitch back to create a loop that fits over your button.
Weaving In Ends Like a Pro
Weaving in ends sucks. There is no way around it. But rushing through this step means your romper might unravel in the wash.
Thread each end onto a yarn needle. Weave through at least 2 inches of stitches, changing direction once. Do not just knot and cut—knots work their way loose over time. A proper weave stays put forever.
Size Adjustments and Customization Ideas
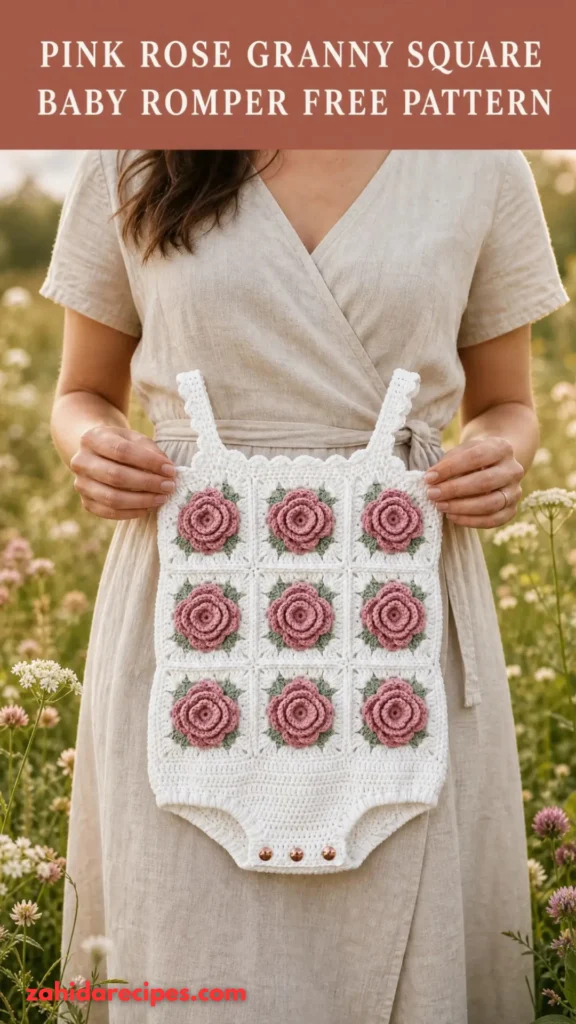
This pattern fits approximately 6 to 12 months as written, with a chest circumference around 17 to 19 inches. Want a different size?
For newborn (0-3 months): Use a smaller hook (3.5 mm) and lighter yarn. Reduce your square count to 6 to 8 squares. Shorten the straps.
For 12-18 months: Go up to a 4.5 mm hook. Add an extra row of squares to the bodice. Lengthen the body section by 1 to 2 inches before starting the leg openings.
Color customization is where this pattern really shines. Swap pink rose for lavender and cream. Try teal and coral. Make the squares in rainbow shades for a totally different vibe. The granny square structure handles color play beautifully.
Frequently Asked Questions
How long does this romper take to make?
Plan for 6 to 10 hours if you are comfortable with granny squares and basic garment assembly. First-timers should budget 12 to 15 hours.
Can I use worsted weight yarn instead of DK?
Yes, but your finished romper will be larger. Adjust your hook size down and check gauge carefully. Worsted weight works best for 12-18 month sizes.
Do I have to block the squares?
Technically no, but your seams will look uneven. Blocking takes 20 minutes and makes a massive difference in the final look.
How do I wash the finished romper?
Machine wash cold on gentle cycle. Tumble dry low or lay flat to dry. Cotton yarn gets softer with each wash, so do not baby the romper—it can handle real life.
You Might Also Like:
Final Thoughts
A pink rose granny square romper combines everything lovable about crochet: classic motifs, sweet colors, and a finished piece that makes people gasp. The construction breaks down into simple steps—make squares, join them, add bloomers, attach straps. Nothing here requires expert-level skills.
Pick your pink. Grab that hook. Start making squares tonight. Before you know it, you will have a tiny heirloom that some baby will look absolutely adorable in.



Leave a Reply
You must be logged in to post a comment.