Snowdrop Pearl Headband Crochet Pattern
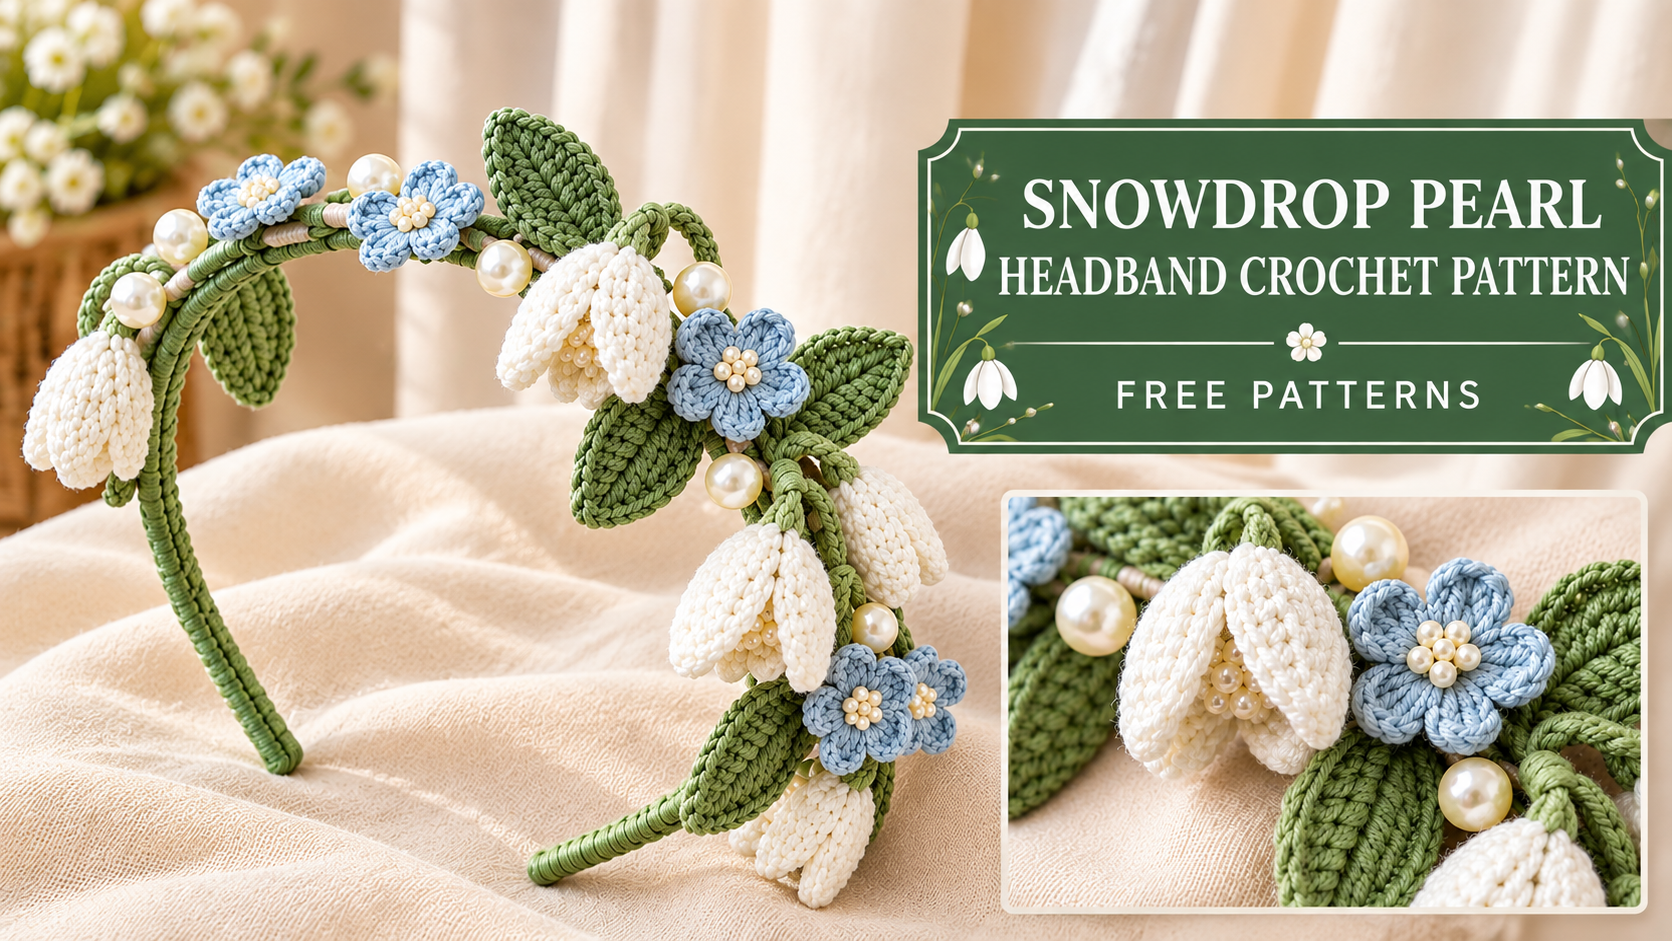
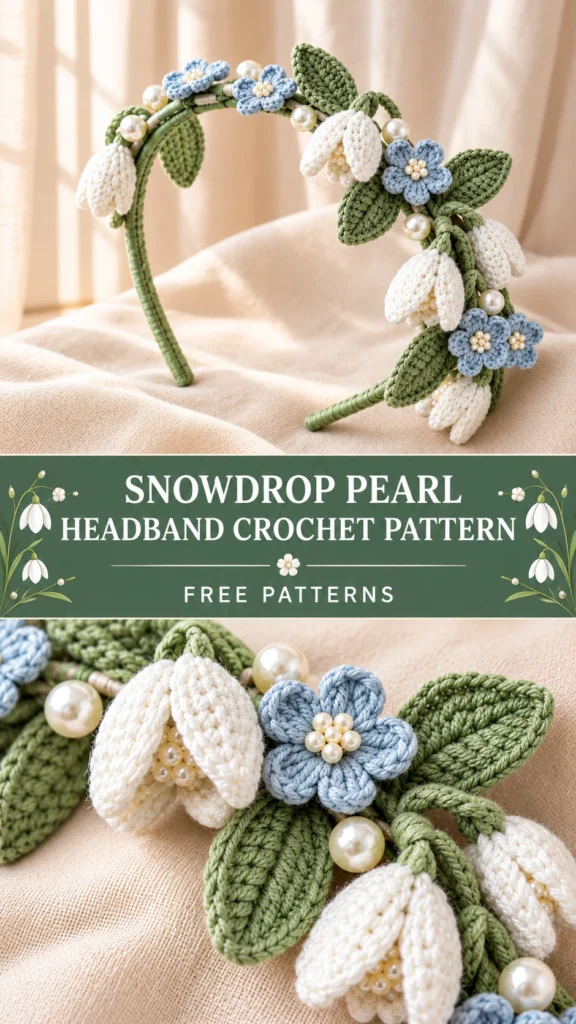
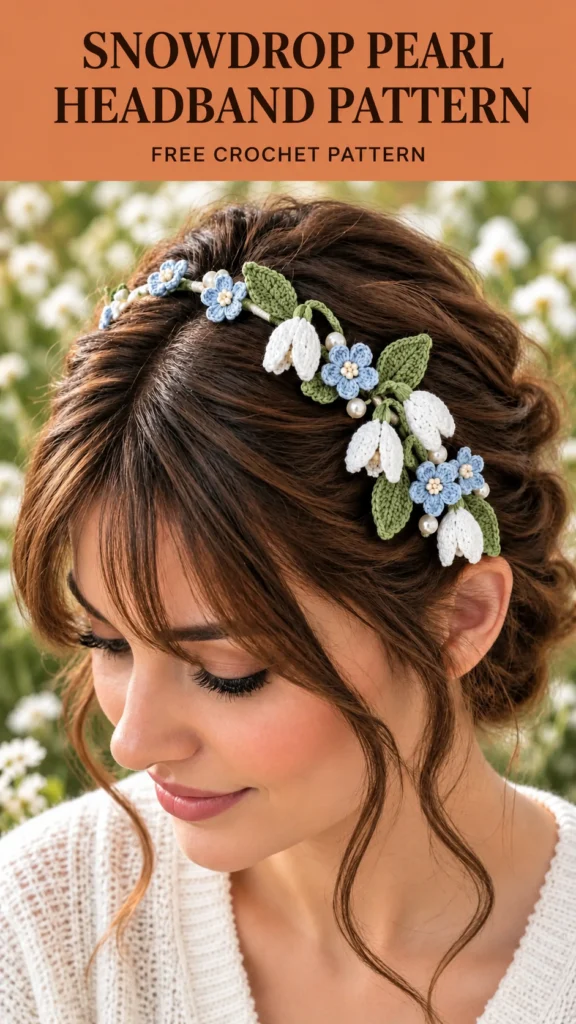
There’s something ridiculously charming about tiny snowdrop flowers, isn’t there? This Snowdrop Pearl Headband turns that delicate look into a wearable crochet accessory with ivory bells, blue blossoms, leafy details, and scattered pearls. The best part? You can build every little motif separately, then bring the whole garden together on one simple headband. Grab your hook, settle in, and let’s make something pretty.
Get the Ad-Free PDF Pattern
If you prefer crocheting without constantly scrolling, an ad-free printable version makes life much easier. Keep it beside your yarn, mark each completed section, and enjoy the luxury of not accidentally scrolling three pages backward with one clumsy finger.
The original pattern follows a modular approach, so you crochet the flowers and leaves separately before attaching them to the wrapped headband base. That approach also makes customization surprisingly easy.
Materials You Will Need
Gather everything before you start. Tiny crochet projects love creating tiny emergencies, usually because the one thing you need sits somewhere on the other side of the room.
- Thin flexible headband: about 1/4 inch (6 mm) wide
- Ivory fine cotton: for snowdrop petals
- Pale silver-blue cotton: for five-petal flowers
- Eucalyptus green: for leaves and the wrapped band
- Cream yarn: for flower centers
- 1.75–2.25 mm crochet hook: around 2 mm works well for fine cotton
- Fine sewing needle and tapestry needle
- Small scissors
- Blocking mat and rustproof pins
- 8–12 small pearls: around 3–4 mm
Smooth, tightly twisted mercerized cotton works particularly well because it keeps the tiny stitches crisp. Skip fuzzy yarn for this project. The fluff can hide your carefully worked petals and turn delicate snowdrops into tiny yarn pom-poms. The reference pattern also recommends fine mercerized cotton for this reason.
Abbreviations and Definitions
You’ll work with familiar crochet stitches, but the small scale makes stitch placement especially important.
- ch: chain
- sl st: slip stitch
- sc: single crochet
- hdc: half double crochet
- dc: double crochet
- tr: treble crochet
- st/sts: stitch/stitches
- sp: space
- MR: magic ring
- yo: yarn over
- rep: repeat
- FO: fasten off
If you already know these stitches, great. If not, keep your tension relaxed and practice each one on scrap yarn first. Tiny flowers magnify tension differences, so a quick practice swatch can save plenty of frogging later.
Special Techniques
Tiny Cream Bobble
The tiny bobble creates the raised center of each silver-blue blossom. Work three partial double crochets into the same spot, leaving the final loops on your hook. Yarn over and pull through all the remaining loops together.
Push the bobble toward the front with your fingertip. That little push makes a surprisingly big difference.
Invisible Motif Finish
For a polished flower, leave a sewing tail after fastening off. Thread the tail onto your needle, pass it beneath the first stitch, then bring it back through the final stitch. This creates a faux stitch that blends into the round instead of leaving an obvious knot.
Neat Sewing Method
When you attach flowers and leaves, sew through the underside or back loops whenever possible. Use several small anchoring stitches instead of one huge stitch.
Keep the needle away from the visible front whenever you can. Your flowers should look naturally attached rather than stapled to the headband by an overenthusiastic crochet goblin.
Part 1: Wrapped Headband Base
Start with the foundation. The green-wrapped band gives the floral arrangement a clean botanical backdrop.
- Try the blank headband on and mark the crown and right-temple area.
- Leave roughly 1/2 inch at each end unwrapped if the band has hard end caps.
- Leave a 6-inch yarn tail and anchor eucalyptus yarn near one end.
- Wrap the yarn around the band in closely spaced, parallel turns.
- Keep your tension firm and consistent without overlapping the wraps.
- Secure the yarn at the opposite end by weaving it underneath several wraps.
- Add tiny hidden tack stitches at the crown, temple, and ends.
Try the band on again before adding any flowers. Check the fit now. Once you sew on the motifs, changing the size gets much more annoying.
Part 2: Snowdrop Bell Flowers
Now for the stars of the show. Each snowdrop uses three narrow ivory petals that join near the top and hang downward like tiny bells.
A. Narrow Cupped Petal
- Chain 7.
- Starting in the second chain, work a slip stitch, single crochet, two half double crochets, and one double crochet.
- Work 5 double crochets into the final chain.
- Turn your work and crochet along the opposite side of the foundation chain.
- Work one double crochet, two half double crochets, one single crochet, and a slip stitch.
- Fasten off with a long sewing tail.
- Pinch the lower half of the petal gently to create a soft cup.
Make three petals for each snowdrop. Aim for four or five snowdrops, giving you 12–15 petals in total. The reference pattern uses this same three-petal construction.
B. Green Calyx Cap
Make a small magic ring with eucalyptus yarn and work six single crochets into it. Close the ring, then create three tiny pointed sepals using short chains and slip stitches.
C. Assemble One Bell
Overlap the top ends of three ivory petals so they form a small triangular tube. Sew the upper portion together, then place the green calyx over the join.
Shape the petals so they droop slightly apart. Don’t flatten them. The gentle cup gives the snowdrop its recognizable bell-like silhouette.
Part 3: Silver-Blue Five-Petal Blossoms
The blue flowers add contrast without stealing attention from the snowdrops. Make five or six of them for a balanced arrangement.
- Create a magic ring with silver-blue yarn.
- Repeat five times: slip stitch, chain 2, two double crochets, chain 2, slip stitch.
- Pull the ring almost closed, leaving a tiny center opening.
- Fasten off and secure the tail.
- Add one tiny cream bobble to the center.
- Gently shape the five petals into rounded lobes.
Lightly block the flowers if they look uneven. Keep the bobble raised rather than pressing it flat.
Part 4: Eucalyptus Leaves
Leaves fill the gaps between flowers and make the arrangement feel more like a tiny botanical branch.
Small Leaf
Chain 6. Work a slip stitch, single crochet, half double crochet, double crochet, and five double crochets into the final chain. Continue down the opposite side with a double crochet, half double crochet, single crochet, and slip stitch.
Medium Leaf
Chain 8 and work a slightly longer sequence that includes a treble crochet. Make four or five small leaves and three or four medium leaves.
For extra definition, add a central vein with darker green backstitches. Keep the stitches loose enough to let the leaf bend naturally.
Part 5: Pearl Accents
Now add the sparkle. Use eight to twelve small pearls and scatter them instead of creating a continuous row.
- Sew each pearl through at least two passes.
- Use doubled sewing thread for extra security.
- Anchor the thread around several yarn wraps or a sturdy motif base.
- Place pearls between flowers and leaves.
- Keep pearls away from the ends where they could catch your hair.
Think “scattered dew drops,” not “pearl necklace.” A little restraint makes the finished headband look much more elegant.
Part 6: Motif Layout Guide
This design works best with an asymmetrical layout. Keep the left side airy and let the right temple carry most of the floral drama.
- Left Crown: one blue blossom, one small leaf, and optionally one pearl.
- Upper-Left Transition: one downward-facing snowdrop, one blue blossom, and one medium leaf.
- Center Crown: one leaf and one pearl with a little breathing room.
- Right-Temple Cluster: two or three snowdrops, two or three blue blossoms, three or four leaves, and four to six pearls.
- Near Right Ear: one small flower or leaf followed by one pearl.
The source pattern uses this intentionally fuller right-temple arrangement to create a delicate asymmetrical silhouette.
Part 7: Final Assembly
- Lay the headband on a folded towel or rounded form.
- Pin every motif in position before sewing.
- Attach leaves first so they form the background.
- Sew blue blossoms next, anchoring the centers while keeping the petals free.
- Attach snowdrop bells securely by their calyxes or stems.
- Build the fuller cluster above the right temple.
- Add pearls into the remaining gaps.
- Hide every yarn tail underneath the band wraps.
- Shape the petals and leaves gently with your fingertips.
- Allow the finished headband to dry completely before wearing it.
Shaping and Finishing Notes
- Pinch snowdrop petals gently while damp to encourage a graceful droop.
- Curve medium leaves slightly away from the band for extra dimension.
- Use a smaller hook if the motifs feel floppy.
- Keep the pearls small so they complement rather than overpower the flowers.
- For a flatter profile, shorten the snowdrop foundation chain slightly.
IMO, shaping makes the biggest difference in this pattern. Crochet pieces often look a little unimpressive immediately after you fasten off. Give them some gentle shaping and suddenly they look like they had a tiny professional makeover.
Motif Count Checklist
- Wrapped headband base: 1
- Ivory snowdrop bells: 4–5
- Silver-blue blossoms: 5–6
- Small eucalyptus leaves: 4–5
- Medium eucalyptus leaves: 3–4
- Pearl beads: 8–12
Keep this checklist beside you while crocheting. It saves you from reaching the assembly stage and discovering that you somehow made eleven leaves and zero flowers. We’ve all been there.
Troubleshooting Common Issues
Flowers look bulky
Try finer cotton or a smaller hook. Also reduce the number of attachment stitches so the petals can lift naturally.
Snowdrop petals spread too wide
Sew the upper section of all three petals together more firmly. Then dampen and pinch the petals into a gentle cup.
Band wrapping shifts
Add hidden tack stitches through the wrap at regular intervals. Small anchor points can keep the entire base stable without changing its appearance.
Pearls flop around
Use doubled thread and stitch through each pearl twice. Anchor the thread around more than one yarn wrap rather than relying on a single crochet loop.
The cluster looks too symmetrical
Remove one motif from the lighter side and move it toward the right temple. Vary the leaf angles and leave small gaps between flowers.
Customization Options
More Minimal
Use three snowdrops, four blue blossoms, five leaves, and six pearls. Keep the decoration concentrated from the center crown toward the right temple.
More Bridal
Use more ivory flowers, wrap the band in ivory instead of green, and increase the pearl count while keeping the beads tiny. This version would look especially pretty with a simple wedding hairstyle.
More Winter-Blue
Choose a cooler blue for the blossoms and dusty sage for the leaves. Keep the snowdrops warm ivory so the flowers still stand out.
Care Instructions
Give your finished headband gentle care. Spot clean it with cool water and mild soap whenever possible rather than soaking the entire piece.
Blot away moisture with a towel, reshape the flowers while damp, and let everything air-dry away from direct heat. Store the headband in a shallow box so the pearls and delicate snowdrop bells don’t get crushed.
You Might Also Like
- Sunflower Summer Tote Free Crochet Pattern
- Lavender Dreams Flower Square Tote Free Crochet Pattern
- Lavender Fields Granny Square Bag Free Crochet Pattern
- Warm Mustard Yellow Drawstring Bucket Bag Free Pattern
- Natural Raffia Summer Tote with Coral Fabric Tassels Pattern
FAQ’s
How long does the Snowdrop Pearl Headband take to make?
Expect several hours if you work carefully, especially if you’re new to fine crochet. The flowers and leaves themselves work up fairly quickly, but assembling and sewing the tiny motifs takes patience.
Can I use different yarn?
Absolutely. Smooth cotton gives the crispest result, but you can experiment with other fine yarns. Just remember that thicker yarn will make larger motifs, which can change the delicate proportions of the original design.
Can I change the colors?
Definitely. Try blush and cream for a romantic version, lavender and sage for a softer spring palette, or icy blue and white for a frosty winter look. The construction works with plenty of color combinations.
Will the pearls stay attached?
They will if you sew them securely. Use strong thread, make at least two passes through each pearl, and anchor your thread around sturdy parts of the wrapped band or motif bases.
Can I make the headband smaller?
Yes. Adjust the blank headband to the desired size before you begin wrapping it. You can also change the floral span by using fewer motifs or concentrating the decoration over a smaller section.
Can I make it for a child?
Yes. Choose an appropriately sized flexible headband and reduce the number of motifs so the decoration stays comfortable and proportional. Keep every embellishment securely attached for regular wear.
Final Thought
This Snowdrop Pearl Headband proves that small crochet projects can still make a huge impression. The tiny bells, blue flowers, eucalyptus leaves, and pearl accents work together without making the accessory feel heavy or overdone.
The modular construction also gives you plenty of freedom. Make the floral cluster fuller, simplify it, change the colors, or skip a few pearls. Your headband doesn’t need to look identical to anyone else’s.
So grab that fine cotton, sharpen your hook skills, and make yourself a little wearable winter garden. It’s delicate, handmade, and just fancy enough to make an ordinary outfit feel special.