


There is something magical about the first snowfall of winter. I love how tiny snowflakes settle on windows, rooftops, and tree branches, creating delicate patterns that seem almost too beautiful to be real. That inspiration is what led me to design this Winter Snowflake Bracelet Free Crochet Pattern.
I wanted to create a piece of crochet jewelry that captured the delicate beauty of snowflakes without making the bracelet feel too heavy or complicated. After experimenting with different thread sizes and snowflake shapes, I settled on small six-pointed motifs made with fine cotton thread. Each motif has an open center and delicate pointed edges that give it a lovely icy appearance.
The finished bracelet is lightweight, feminine, and surprisingly versatile. You can wear it with a cozy winter sweater, a festive holiday outfit, or even a simple everyday look. I especially love how the white thread resembles freshly fallen snow, while tiny silver accents add a subtle frosty sparkle.
This Winter Snowflake Bracelet is a lovely project for crocheters who enjoy delicate accessories and small decorative motifs. Let’s get started!
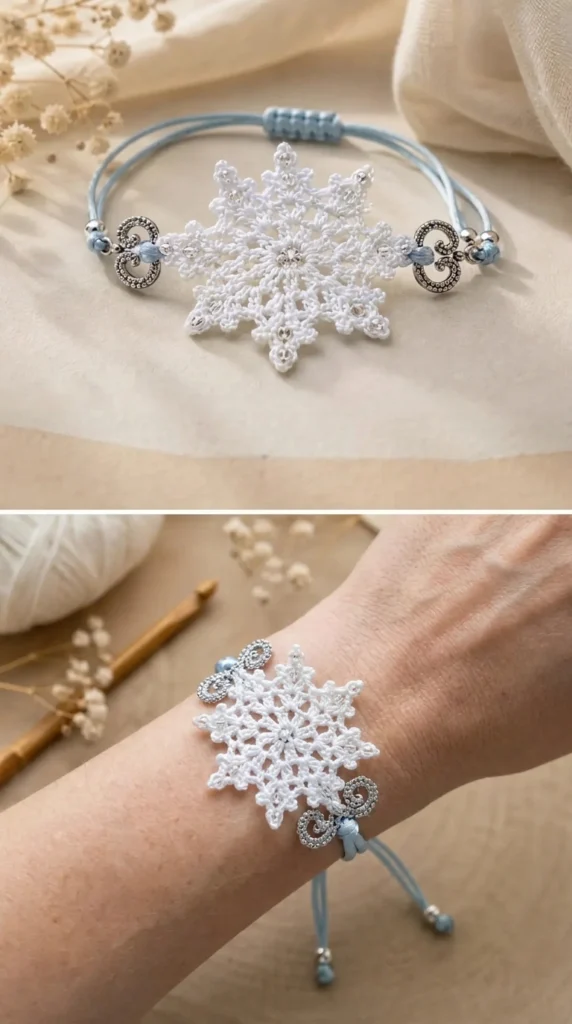
About This Winter Snowflake Bracelet Pattern
This bracelet is made from five individual crochet snowflake motifs connected together to create a delicate decorative band. Each snowflake is worked separately in rounds, beginning with a small center ring and developing into a six-pointed design.
Once the motifs are complete, they are arranged in a horizontal line and joined at their outer points. A simple chain tie is added at both ends to make the bracelet adjustable.
The snowflakes feature open chain spaces, small stitches, and pointed picot details. These elements create a crisp, lace-like appearance that resembles the natural structure of winter snowflakes.
Pattern Details:
- Project Type: Crochet jewelry and accessories
- Skill Level: Advanced Beginner to Intermediate
- Crochet Terminology: US terms
- Construction: Five separate snowflake motifs joined together
- Finished Bracelet Length: Approximately 7–8 inches, excluding ties
- Bracelet Width: Approximately 1.25 inches
- Motif Size: Approximately 1.1–1.25 inches across
- Technique: Working in rounds, chain spaces, picots, and motif joining
You should already be comfortable with basic crochet stitches, working in small rounds, and making chain spaces. The picot details require a little patience, especially because the thread is fine.
Don’t rush the motifs. Keeping your stitches consistent will make a noticeable difference in the final appearance.
Materials You’ll Need
For this design, I recommend fine cotton thread because it holds its shape well and allows the snowflake points to remain clearly defined.
Yarn
- Color A – Snow White: Approximately 35–45 yards of size 10 crochet cotton thread.
- Color B – Silver (optional): Approximately 5 yards of metallic embroidery thread for decorative accents.
White creates a traditional snowflake appearance, but pale blue, icy lavender, pearl gray, and soft cream are also beautiful choices.
Allow approximately 15% extra thread for gauge variation and finishing.
Crochet Hooks
- 1.5 mm steel crochet hook for the snowflake motifs.
- 1.75 mm steel crochet hook for the bracelet ties if you prefer slightly looser chains.
Notions
- Tapestry needle
- Small sharp scissors
- Stitch markers
- Blocking pins
- Blocking mat
- Measuring tape
- Small sewing needle
- Optional tiny silver beads
- Optional jewelry clasp or small button
If you plan to add beads, choose lightweight beads with openings large enough for your thread.
Abbreviations and Terminology
This pattern uses standard US crochet terminology.
- MR: Magic Ring – An adjustable loop used to begin crocheting in the round.
- ch: Chain – Yarn over and pull through the loop on your hook.
- sl st: Slip Stitch – Insert the hook, yarn over, and pull through both loops.
- sc: Single Crochet – Insert hook, yarn over, pull up a loop, yarn over, and pull through both loops.
- hdc: Half Double Crochet – Yarn over, insert hook, pull up a loop, yarn over, and pull through all three loops.
- dc: Double Crochet – Yarn over, insert hook, pull up a loop, yarn over and pull through two loops twice.
- picot: A decorative pointed detail made by chaining three stitches and slip stitching into the first chain.
- st(s): Stitch or stitches.
- sp: Space.
- rep: Repeat.
- FO: Fasten Off.
Important Notes:
- Turning chains do not count as stitches unless specifically stated.
- Work the motifs with consistent tension.
- The beginning chain spaces are decorative and do not count as individual stitches.
- Slip stitches should remain loose enough to avoid pulling the snowflake points inward.
- Stitch counts refer to the stitches and chain spaces specified in each round.
Gauge
Because this is a small crochet jewelry project, gauge is important for keeping all five snowflakes approximately the same size.
Make one complete snowflake motif using your chosen thread and hook.
Your finished motif should measure approximately 1.1–1.25 inches across its widest points.
If your motif is larger than expected, try a smaller crochet hook. If it is too small or feels stiff, move up to a slightly larger hook.
Avoid pulling the thread too tightly when making the picot points. Tight tension can cause the snowflake to curl and lose its delicate shape.
For the best results, make all five motifs using the same hook and thread combination.
Winter Snowflake Bracelet Crochet Pattern Instructions
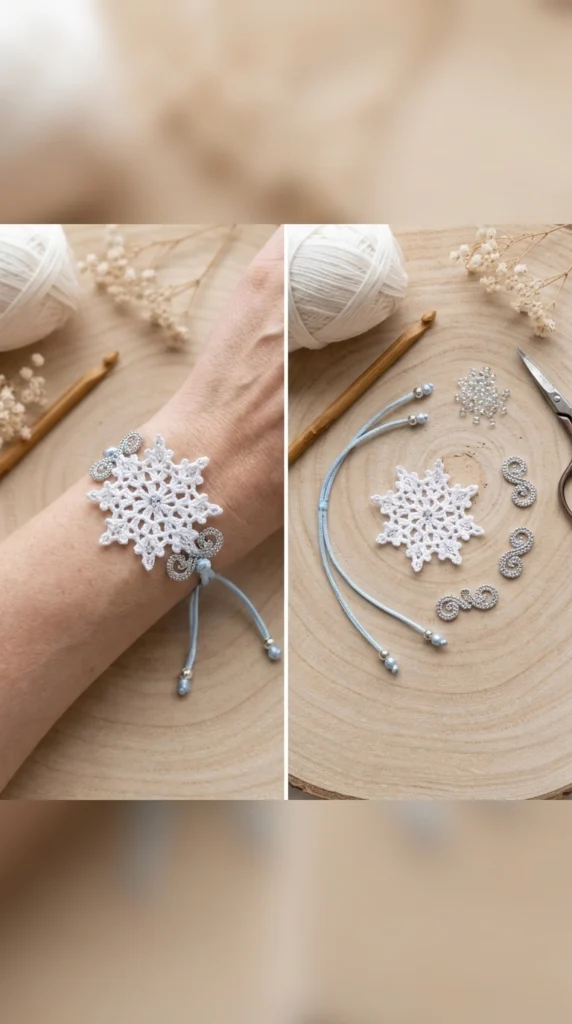
Part 1: Crochet the Snowflake Motifs
You will make five identical snowflake motifs.
Each motif is worked in three rounds, beginning at the center and finishing with six decorative points.
Use Color A throughout this section.
Round 1: Create the Snowflake Center
Step 1: Make a magic ring.
Step 2: Ch 1 (does not count as a stitch).
Step 3: Work 6 sc into the magic ring.
Step 4: Pull the adjustable ring closed.
Step 5: Join with a sl st to the first sc.
Count: 6 sc.
The center should form a small, neat circle. Avoid tightening the magic ring so much that the stitches become difficult to work into during the next round.
Round 2: Create Six Open Spaces
This round establishes the foundation for the snowflake arms.
Step 1: Ch 1.
Step 2: Ch 4, which counts as one chain-space loop.
Step 3: Skip the next sc and work 1 sc into the following sc.
Step 4: Repeat the following sequence around:
- Ch 4.
- Skip the next sc.
- Sc in the following sc.
Continue until you have completed six chain spaces.
Step 5: Join with a sl st to the first sc.
Count: 6 sc and 6 ch-4 spaces.
You should now have six evenly spaced openings around the center. These spaces will become the foundation for the snowflake points.
Round 3: Form the Snowflake Points
This is the decorative round that gives the motif its recognizable winter appearance.
Work the following sequence into each ch-4 space:
- Sl st into the chain space.
- Ch 1.
- Work 1 sc.
- Work 1 hdc.
- Make a picot: Ch 3, then sl st into the first chain.
- Work 1 dc.
- Work 1 hdc.
- Work 1 sc.
- Sl st into the same chain space to finish the point.
Repeat this sequence in all six chain spaces.
After completing the sixth point, join with a sl st to the beginning slip stitch of the round.
Fasten off, leaving a tail long enough for weaving in.
Count Check: You should have six clearly defined snowflake points, each with one picot tip.
The picots form the sharp outer edges, while the taller stitches create a gentle slope on both sides of each point.
Repeat for the Remaining Motifs
Make four additional snowflakes using the same instructions.
You should now have five matching motifs.
Lay them flat and compare their sizes before moving on. If one motif looks noticeably larger or smaller, gently adjust its shape during blocking.
Part 2: Add Delicate Silver Details
Silver details are optional, but I love how they make the snowflakes look as though they have caught a little winter frost.
There are two simple ways to decorate your motifs.
Option 1: Silver Center Accents
Thread a small sewing needle with silver embroidery thread.
Bring the needle through the center of one snowflake and make two or three tiny stitches to create a subtle metallic detail.
Repeat for all five motifs.
Keep the thread flat against the back so it does not create uncomfortable bumps when worn.
Option 2: Small Silver Beads
If you prefer a little sparkle, sew one tiny silver bead into the center of each snowflake.
Use a small needle and secure each bead firmly.
Avoid using heavy beads because they may pull the delicate crochet motifs out of shape.
For everyday wear, I prefer the simple silver thread option.
Part 3: Join the Snowflake Motifs
Once all five motifs are complete, arrange them in a straight horizontal line.
Place each snowflake with its points facing outward and its center opening visible.
The motifs should sit close together without overlapping too much.
Joining Instructions
You can join the motifs using a tapestry needle and matching white thread.
Step 1: Place the first two snowflakes side by side.
Step 2: Identify the two closest outer points.
Step 3: Using the long thread tail or a separate length of cotton thread, make two or three small joining stitches through the corresponding picot tips and nearby stitches.
Step 4: Secure the join without pulling the motifs tightly together.
Step 5: Repeat this process to attach the remaining three motifs.
The goal is to create a flexible bracelet band rather than a rigid strip.
Check that the motifs remain evenly spaced. The connection should be secure but nearly invisible from the front.
When all five snowflakes are joined, weave in the remaining thread ends.
Part 4: Crochet the Bracelet Ties
Now we need to make the adjustable ends.
The ties are simple chains that extend from the first and last snowflakes.
Use Color A.
First Tie
Attach the thread to a secure stitch at the outer edge of the first snowflake.
Row 1: Ch 55–65, depending on your wrist measurement.
Sl st into the second chain from the hook and continue slip stitching loosely across the chain if you want a more substantial tie.
Alternatively, leave the chain as it is for a delicate, lightweight finish.
Fasten off and weave in the end securely.
Second Tie
Attach the thread to the corresponding outer edge of the fifth snowflake.
Repeat the same chain instructions.
Make sure both ties are approximately equal in length.
You can finish the ends with tiny knots or small decorative beads to prevent the chains from unraveling.
Adjusting the Bracelet Length
Wrap the bracelet around your wrist before securing the ends.
The five snowflakes should sit comfortably on top of your wrist without twisting or pulling.
If you prefer a more secure closure, you can replace the chain ties with a small jewelry clasp.
For an adjustable bracelet, however, the simple chain ties are my favorite option.
Assembly and Finishing
The assembly process is where the individual motifs become a complete piece of crochet jewelry.
Before finishing, place the bracelet on a flat surface and check the following:
- All five snowflakes face the same direction.
- Each motif has six visible points.
- The joins are secure.
- The ties extend evenly from both ends.
- No loose thread ends are visible.
- The bracelet bends naturally without pulling at the connections.
Use a tapestry needle to weave in any remaining tails.
Weave each end through several nearby stitches on the wrong side of the motif, changing direction once or twice to help secure it.
Trim excess thread carefully.
If you added beads, check that they are firmly attached and that no sharp edges are exposed.
For an extra polished appearance, you can add a tiny silver charm to one bracelet tie. A small star or snowflake charm complements the design beautifully.
Blocking and Care Instructions
Blocking is particularly important for this Winter Snowflake Bracelet because the delicate points can curl slightly after crocheting.
I recommend gentle wet blocking for cotton thread.
How to Wet Block the Snowflakes
- Fill a small bowl with cool or lukewarm water.
- Add a little gentle fabric wash if needed.
- Place the finished bracelet in the water for a few minutes.
- Remove it carefully without stretching the motifs.
- Place it between two clean towels and gently press out excess water.
- Arrange the five snowflakes on a blocking mat.
- Use rustproof pins to shape the six points of each motif.
- Allow the bracelet to dry completely.
Do not stretch the motifs excessively. The goal is to open the lace spaces and define the points, not change their original dimensions.
Care Tips
- Hand wash gently when necessary.
- Avoid harsh detergents and bleach.
- Never wring or twist the bracelet.
- Dry flat after washing.
- Store in a small jewelry pouch.
- Keep away from rough surfaces that could catch the thread.
- Remove the bracelet before swimming or showering.
If you have used metallic thread or decorative beads, avoid soaking the bracelet for extended periods.
Fit and Troubleshooting Tips
Even a small crochet jewelry project can present a few challenges. Here are some solutions to common problems.
1. My Snowflake Motifs Are Curling
Curling usually happens because the stitches are too tight or the picot points are being pulled inward.
Try using a slightly larger hook and keeping your slip stitches relaxed.
Blocking should also help open the motifs.
2. My Snowflakes Look Uneven
Check your stitch counts after each round.
Each motif should have exactly six chain spaces in Round 2 and six points in Round 3.
If one motif is noticeably different, check your tension and make sure you are working into the correct chain spaces.
3. The Bracelet Feels Too Tight
Increase the length of the chain ties or add a small extension chain.
Remember that the bracelet should sit comfortably around your wrist without pulling the motifs together.
4. The Motifs Twist After Joining
This usually happens when the joining stitches are too tight or the motifs are not positioned evenly.
Lay the bracelet flat before joining and use only a few loose stitches at each connection point.
5. The Snowflake Points Look Rounded
Make sure you are creating the picot correctly.
Chain three stitches and slip stitch into the first chain, not into the third chain.
This creates a small pointed detail rather than a loose loop.
6. My Bracelet Looks Too Delicate
You can use slightly thicker cotton thread or add a second row of small decorative stitches around the motif centers.
However, avoid making the bracelet too heavy. The delicate appearance is part of its charm.
Customization Ideas for Your Winter Snowflake Bracelet
One of my favorite things about handmade crochet jewelry is how easily you can personalize it.
Once you understand the basic motif, you can experiment with different colors and decorative details.
Classic Snow White: Use pure white cotton thread for a traditional snowflake appearance.
Icy Blue: Pale blue thread creates a cool winter-inspired bracelet that looks beautiful with silver accents.
Silver Frost: Use white cotton for the motifs and metallic silver embroidery thread for the centers.
Soft Lavender: A pale lavender color gives the bracelet a gentle, romantic appearance.
Pearl White: Add tiny pearl beads to the center of each snowflake for a more elegant accessory.
You can also make a matching pair of snowflake earrings using two of the same motifs and lightweight earring hooks.
If you want a coordinated winter jewelry set, a small crochet snowflake necklace would be another lovely project.
Final Thoughts
I hope you enjoy making this Winter Snowflake Bracelet Free Crochet Pattern as much as I enjoyed designing it.
What I love most about this little bracelet is how five simple crochet motifs can become something so delicate and beautiful. The pointed snowflake edges, open lace centers, and optional silver details create a winter-inspired accessory that feels special without requiring a large amount of yarn or a complicated construction process.
This is also a lovely project for using leftover crochet cotton thread. You can make several versions in different winter colors and give them as handmade gifts during the holiday season.
Take your time with the tiny stitches, enjoy the process, and don’t worry if your first snowflake needs a little practice. Every motif becomes easier as you work through the pattern.
If you make this bracelet, I’d love to see your version. Share your finished creation, leave a comment about the colors you chose, or save the pattern to your Pinterest crochet inspiration board.
Happy crocheting !



Leave a Reply
You must be logged in to post a comment.