

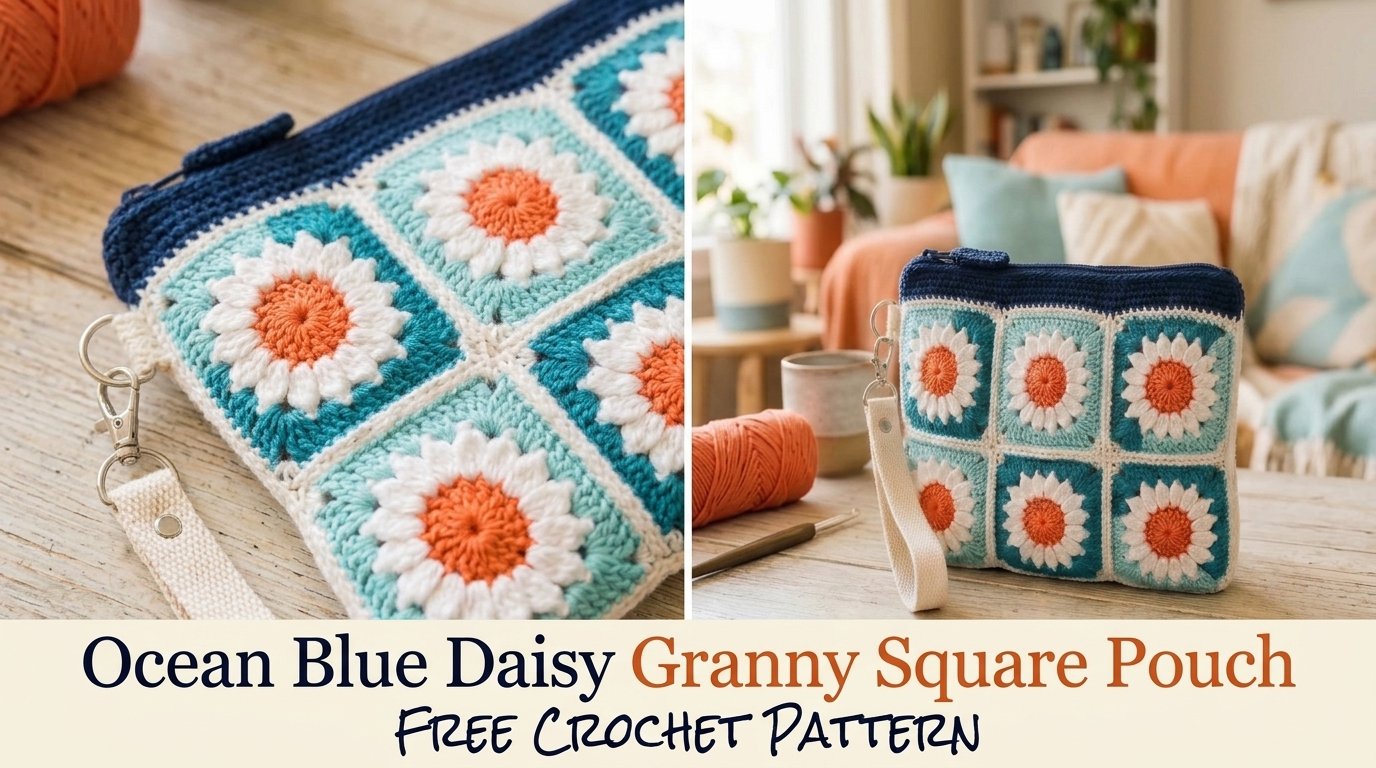
I still remember the afternoon the idea for this little pouch settled into place. I was sitting by an open window with a half-finished granny square on my lap, watching the light shift across the water outside. The blues kept changing—deep cobalt near the rocks, soft turquoise farther out, a pale silver where the sun hit the surface. I wanted something that captured that quiet, layered blue feeling, but soft enough to carry every day.
A few trial squares later, the daisy motif appeared almost by accident. The raised petals in creamy white against the ocean blues felt right the moment I blocked the first one. I knew then it needed to become a pouch—something small, practical, and pretty enough to make you smile every time you unzip it.
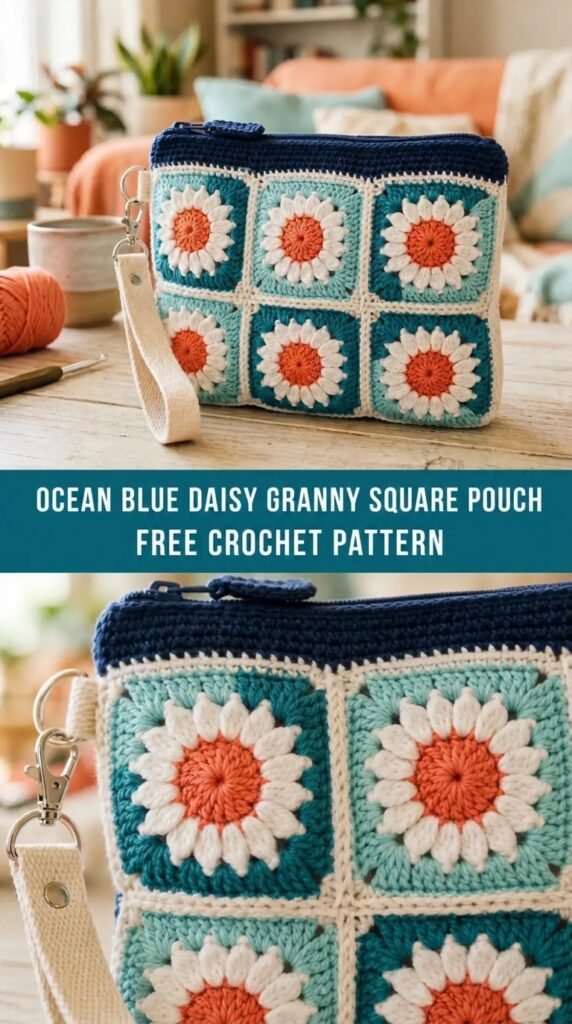
The result is the Ocean Blue Daisy Granny Square Pouch. It’s a compact, structured little bag made from four daisy granny squares joined into a soft rectangle, then finished with a simple top edge and optional drawstring or zipper. The daisy centers sit raised and cheerful while the surrounding rounds create a gentle ripple of blue that feels like looking into clear water.
About This Pattern
This pouch is constructed from four identical daisy granny squares worked in the round. The squares are joined with a slip-stitch seam to form a flat panel that is then folded and seamed along the sides. A clean single-crochet border finishes the top edge, and you can choose either a simple drawstring or a short zipper depending on your preference.
The design sits firmly in intermediate territory. You should be comfortable with working in the round, changing colors cleanly, and keeping tension consistent across multiple rounds. The daisy petals use a combination of double crochet and chain spaces that create a slightly raised texture, so even tension matters.
Finished size after blocking and assembly is approximately 5.5 inches wide by 4.5 inches tall (14 cm × 11.5 cm) when closed. It is roomy enough for coins, lip balm, stitch markers, or a small set of keys, yet still slips easily into a larger bag.
Materials You’ll Need
Yarn (DK weight / light worsted, approx. 100% cotton or cotton blend recommended for structure and stitch definition)
- Color A (Ocean Deep Blue): 45 m / 50 yd
- Color B (Soft Aqua): 40 m / 44 yd
- Color C (Cream or Off-White for petals): 35 m / 38 yd
- Color D (Sunny Yellow for daisy centers): 10 m / 11 yd
Allow 15% extra for gauge variation and swatching.
Hooks
- 3.5 mm (E/4) for the main squares and joining
- 3.25 mm (D/3) for the top border if you prefer a slightly firmer edge
Notions
- Tapestry needle
- Stitch markers (at least 4)
- Scissors
- Optional: 6–7 inch zipper and sewing needle/thread, or 1 yard of coordinating cord for a drawstring
- Blocking mats and pins (or rust-proof T-pins)
- Optional: small button or bead for drawstring ends
Abbreviations and Terminology (US Terms)
- ch – chain
- sc – single crochet (insert hook, yarn over, pull up loop, yarn over, pull through both loops)
- hdc – half double crochet (yarn over, insert hook, yarn over, pull up loop, yarn over, pull through all three loops)
- dc – double crochet (yarn over, insert hook, yarn over, pull up loop, yarn over, pull through two loops, yarn over, pull through remaining two loops)
- tr – treble crochet (yarn over twice, insert hook, yarn over, pull up loop, yarn over and pull through two loops three times)
- sl st – slip stitch (insert hook, yarn over, pull through stitch and loop on hook)
- sp – space
- st(s) – stitch(es)
- rep – repeat
- rnd – round
- beg – beginning
Turning chains do not count as a stitch unless a step explicitly says they do. When changing colors, complete the last yarn-over of the previous stitch with the new color for the cleanest transition.
Gauge
Work one full daisy square and measure after light blocking.
Target: one complete square measures 3.25 inches × 3.25 inches (8.25 cm × 8.25 cm).
If your square is larger, go down a hook size. If smaller, go up a hook size. Consistent tension across all four squares is more important than exact gauge, but staying close to this size keeps the finished pouch balanced.
Main Pattern Instructions

Daisy Granny Square (Make 4)
Note: Each square begins in the center and works outward. You will change colors at the end of certain rounds.
Rnd 1 (Color D – Yellow):
Make a magic ring (or ch 4 and join with sl st to form a ring).
Ch 3 (counts as first dc), work 11 dc into the ring. Join with sl st to top of beg ch-3. (12 dc)
Fasten off Color D.
Rnd 2 (Color C – Cream):
Join Color C in any dc.
Ch 1, sc in same st, *ch 3, skip next st, sc in next st; rep from * around, ending with ch 3. Join with sl st to first sc. (6 sc, 6 ch-3 sps)
Rnd 3 (still Color C):
Sl st into first ch-3 sp.
*(Sc, hdc, 3 dc, hdc, sc) in same ch-3 sp (petal made), sl st in next sc; rep from * around. Join with sl st to first sc. (6 petals)
Fasten off Color C.
Rnd 4 (Color B – Soft Aqua):
Join Color B in the center dc of any petal.
Ch 3 (counts as dc), dc in same st, *ch 1, 2 dc in center dc of next petal; rep from * around, ending with ch 1. Join with sl st to top of beg ch-3. (12 dc, 6 ch-1 sps)
Rnd 5 (still Color B):
Ch 3, dc in next dc, *2 dc in next ch-1 sp, dc in next 2 dc; rep from * around, ending with 2 dc in last ch-1 sp. Join with sl st to top of beg ch-3. (24 dc)
Fasten off Color B.
Rnd 6 (Color A – Ocean Deep Blue):
Join Color A in any dc.
Ch 3, dc in next 2 dc, *2 dc in next dc, dc in next 3 dc; rep from * around, ending with 2 dc in last dc. Join with sl st to top of beg ch-3. (30 dc)
Rnd 7 (still Color A):
Ch 3, dc in next 3 dc, *2 dc in next dc, dc in next 4 dc; rep from * around, ending with 2 dc in last dc. Join with sl st to top of beg ch-3. (36 dc)
Rnd 8 (still Color A):
Ch 1, sc in same st and in each dc around. Join with sl st to first sc. (36 sc)
Fasten off, leaving a 12-inch tail for seaming later if desired.
Weave in all ends except the final tails you may use for joining. Gently block each square to 3.25 inches square, pinning the daisy petals open so they sit flat and rounded.
Assembly and Finishing
Lay the four blocked squares in a 2 × 2 grid with the daisy centers facing up and all oriented the same way (petals pointing consistently).
Using Color A and a tapestry needle (or the 3.5 mm hook and slip stitch), join the squares along the adjacent edges with a flat slip-stitch seam or mattress stitch. Work through the back loops only for a nearly invisible join.
Once you have a single large rectangle (two squares wide by two squares tall), fold it in half so the short edges meet, right sides together. Seam the two short sides with the same method, leaving the long top edge open. Turn right side out.
Top Border
Join Color A at one side seam.
Ch 1, work sc evenly around the top opening (approximately 36–40 sc, depending on your tension). Join with sl st to first sc.
Optional second round: ch 1, sc in each sc around. Join and fasten off.
Closure Options
- Drawstring: Weave a length of matching cord or a chain of Color A through the top border, entering and exiting at the side seams. Knot the ends or add small beads.
- Zipper: Pin a 6–7 inch zipper along the top edge, right sides together, and sew by hand with small backstitches.
Weave in any remaining ends securely.
Blocking and Care
Although the individual squares were blocked, give the finished pouch a light steam block or wet block after assembly. Pin the corners square and the daisy petals open. Allow to dry completely flat.
Care: Hand wash in cool water with mild soap. Squeeze gently—never wring. Roll in a towel to remove excess water, then reshape and dry flat. Do not hang the pouch while wet, as the weight of the water can stretch the granny squares. Store flat or lightly stuffed so the shape holds.
Fit and Troubleshooting Tips
If the pouch feels slightly cupped after joining, the side seams may be a touch tight. Gently stretch the seams while damp and re-pin during the final block.
If the daisy petals want to curl inward, they were likely worked with tighter tension than the surrounding rounds. Next time, relax your yarn hand on the petal rounds or go up half a hook size just for those rounds.
For a slightly larger pouch, add one more increase round in Color A before the final sc round. For a smaller version, omit Rnd 7 and adjust the top border count accordingly.

Heavy motifs or thicker yarn can make the pouch stiffer. If you prefer more drape, switch to a softer cotton-bamboo blend and accept a slightly less structured finish.
You Might Also Like
- Butter Yellow Bow Bag Free Crochet Pattern
- Sage and Terracotta Boho Butterfly Charm Free Crochet Pattern
- Honeybee Daisy Meadow Charm Bracelet Free Crochet Pattern
- Midnight Garden Gothic Rose Crochet Bracelet Pattern
FAQ’s
Can I use a different yarn weight?
Yes, but the finished size and drape will change. Sport weight will make a smaller, denser pouch; worsted weight will create a larger, softer one. Adjust your hook size to match the yarn and always swatch one full square first so you know what size you’ll end up with.
Is this pattern beginner-friendly?
It’s best suited for intermediate crocheters. You’ll need to be comfortable working in the round, changing colors cleanly, and keeping even tension on the raised petal rounds. Confident beginners who have already made a few granny squares can manage it with careful attention to the instructions.
How long does one pouch take to make?
Most makers finish all four squares in one or two evenings and complete the joining and finishing in a third session. Experienced crocheters can finish the whole pouch in about 4–6 hours of focused stitching time.
Can I make the pouch larger or smaller?
Absolutely. Add or omit one increase round in Color A before the final single-crochet round to change the square size. You can also join six or nine squares for a bigger bag, or use only two squares for a very slim card pouch. Just adjust the top border stitch count accordingly.
Do I have to use a zipper?
No. The pattern includes both zipper and drawstring options. Many people prefer the drawstring for a softer, fully crocheted look. If you choose a zipper, a 6–7 inch nylon or metal zipper works well.
What if my daisy petals look uneven?
Uneven petals usually come from inconsistent tension on the chain spaces or the 3-dc groups. Try to keep your yarn hand relaxed during Rnd 3, and block the squares firmly with the petals pinned open. A light steam after blocking also helps the petals settle into a more uniform shape.
Can I sell items made from this pattern?
Yes. You are welcome to sell finished pouches made from this free pattern. Please credit the design (for example, “Ocean Blue Daisy Granny Square Pouch pattern by [Your Name/Blog]”) when possible. The written pattern itself may not be redistributed or sold.
Final Thoughts
There’s something quietly satisfying about finishing a small project that still feels special. The Ocean Blue Daisy Granny Square Pouch carries that soft water-and-sky palette in a size you can actually use every day. I hope the raised petals make you smile the same way they made me smile when the first square came off the blocking board.
If you make one, I’d love to see it—drop a photo in the comments or tag me on social so I can admire your ocean blues. Happy crocheting, and may your stitches stay even and your daisies stay cheerful.


Leave a Reply
You must be logged in to post a comment.